Triggering actions via an API call
Using an API or webservice to trigger the execution of an action.
Note: This does not work when PDM is on.
PDM can be turned off for a public testing period, please be careful about testing and turning it back on once you have verified your action flow.
About use case
The use case that we'll describe for this example will be: uploading a piece of media, in this case, an image of whatever floats your boat.
We'll set up an action that uploads the file in our application environment. We'll trigger this action using a webservice from the classic environment. You can of course also trigger the action using other API's or webservices.
Let's get started
Starting off the first thing we need is Private Data Mode (PDM) disabled. You can find this option under the advanced section within the settings of your application.
In this case, we want the application to be able to be used by external users. This setting is disabled once your application's status is set to 'live' and you have assured your application is safe for use.
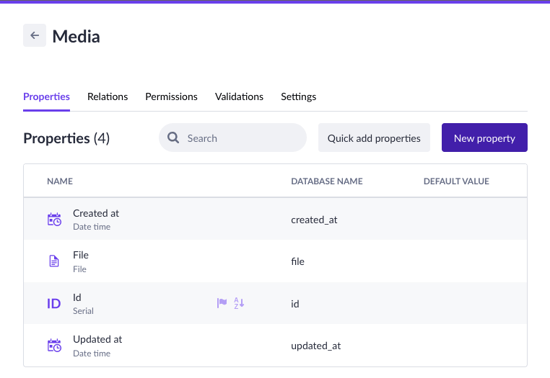
Next, we'll head to our application and build the model for our piece of media as follows:
It'll contain 1 file property that is required. We'll be filling this model with images using an action later.
To create the action, navigate to the actions tab, and add a new action called 'Upload file' or another suitable name. In the Start step add an input variable with the property text called file.

Now let's add the action functions; in this case, we'll use the Store file function and the Create record function.
The Store file step will be set up as follows:
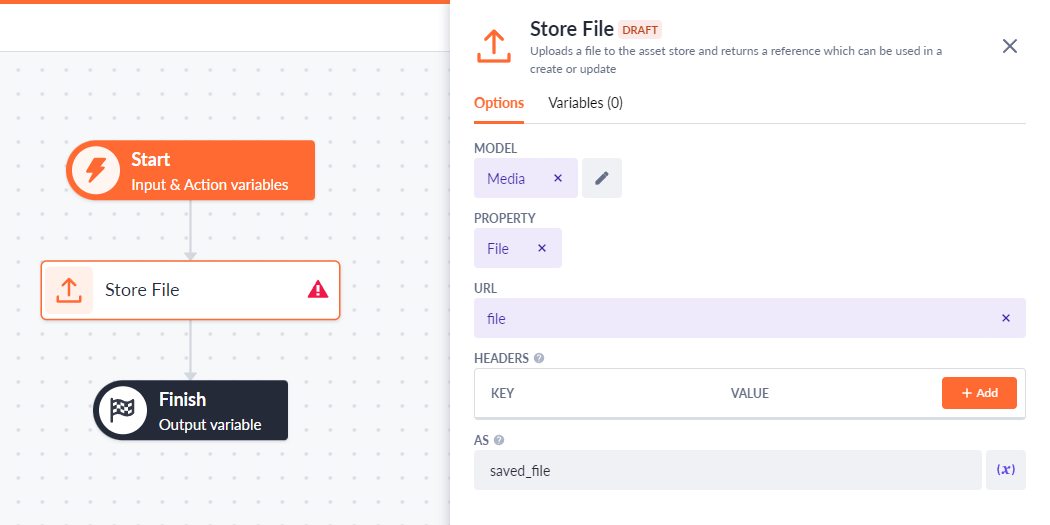
What this function does is it'll upload a file to the asset store and return a reference to where the file is saved. We can then use that reference in the Create record function to save the reference into a new record.
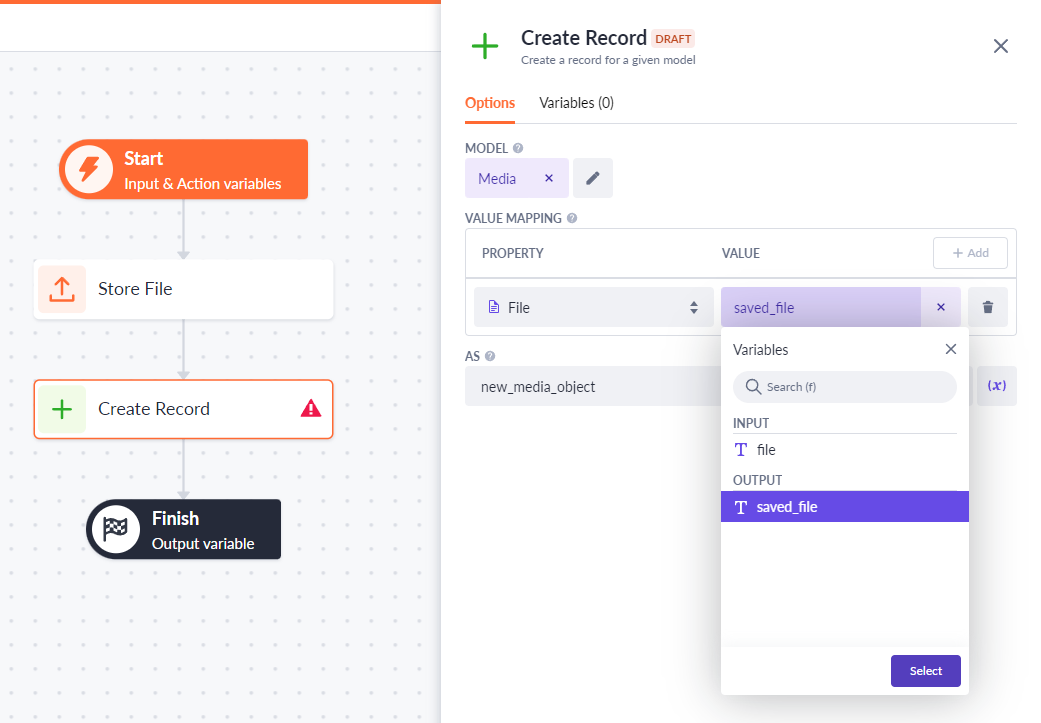
And that's the data model and action done for the current-gen part. A small note is to make sure that all the permissions are set up. Click on the cogwheel icon in the upper right corner to adjust the permission settings.
Authentication profile
If you want you can put all settings to public; for testing purposes this is fine but let's work toward a more production-like use case. For this, we'll need an authentication profile.
Create a model called System that'll be used for our configurations. Add 1 record to this model with the admin role and use it as our authentication profile for executing the action later.
Make sure to add the actual admin role to this 1 record. Add a Has and belong to many relation with the Roles model after which you'll have to assign the admin role to the record.
Creating an API to execute the action
In order to execute the action that we've created we'll create our own API using the classic generation of Betty Blocks. You can use another API or webservice as well to do this but we'll stick to the classic gen for this example. Navigate to the classic environment by clicking the back office icon in the builder bar.
The first thing we'll do is create a new web service called 'BB Data API'. The protocol is HTTPS and the host is [APPLICATION_ID] + “betty.app” or [HOST_URL]. the request content type is JSON.
We need to use the application_id of our application, or the host URL, so that we can establish a connection and do a request to the given API. The application_id is the name of your application in this use case 'taskings'.
Since In this use case we're going for a production-ready use case, we'll have to take security in mind, for this we'll add an input variable called bearer_token and add authorization in the header with the value bearer_token.
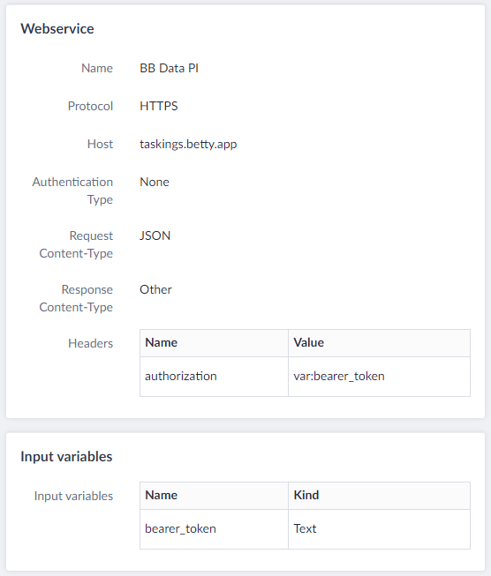
With this done we can create the endpoint that'll call our action.
Create a new endpoint with the following options:
-
Name: [Next gen] File upload
-
Http method: POST
-
Path: “/api/runtime/” + [APPLICATION_UUID]
-
Template: - New -
Not sure what your application UUID is or where to find it? Check out this article to learn more.
With the endpoint in place, we can customize the template for the endpoint. Rename the newly created template to a more suitable name like '[Next gen] File upload template'. The liquid code for the template will be as follows:
The action_id is the action id of the action and can be found in the URL when you have the action open.

Configurations
With the webservice in place, it's time to dive deeper. To make this worthy to run in production we'll need to add some security, this is where the System authentication profile created early comes in place. We'll use that profile to check for a valid bearer token.
Go to the configurations of your application (in the tools section). Create a configuration called 'Data API username' and one called 'Data PI password'. For both values add the data of the single record that's been created in the System model. If you haven't done that yet; do it, but choose a stronger password than in the example here. And make sure the record you create is connected to a role that has the permissions to execute the action.

JwtToken model
Add a new model to your data model JwtToken this model will be used to create a bearer token. Add a data time property with the name 'Expires at' and a multi-line text property called 'Token', make sure both are required.
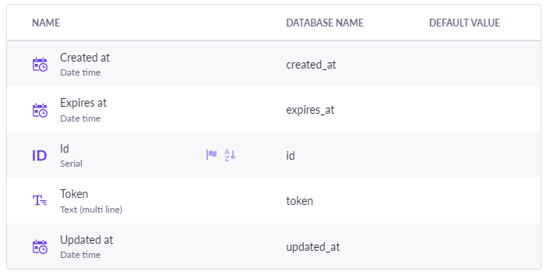
Now create 1 record with fake data for the token. We will update this record properly in an action we'll build later. You can either create a new page with a Create form, or use a template like the CRUD template to create a fake JWT token. Or since we're working with the classic-gen version as well use the back office for this. You can give the record any name you like since we'll update it with the proper value later on, do make sure however to put the expires_at property a few hours in the past since we'll use that to trigger the update.
Check if a user has a valid bearer token
In the classic environment create a new sub-action. Name it '[BB] Login Data API', and also uncheck the 'background' checkbox. Add a condition step to the sub-action.
Add two variables on the condition, one date time expression called 'jwt_token_expiration_date_time'. The expression used will be as follows:
After that, we'll add another variable of the object type to check if the JWT token that we have is older than 1 hour.
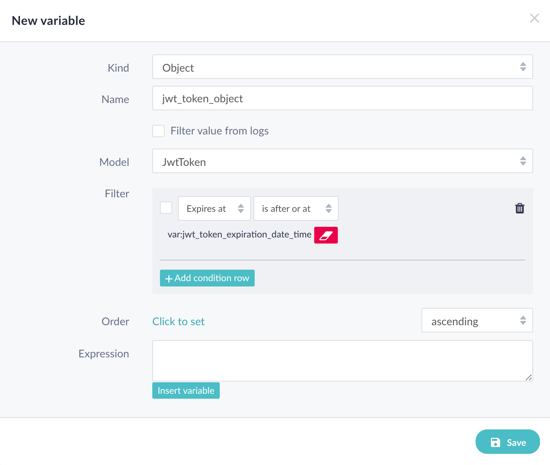
We can then use the expression in the condition to see if there's a JWT token that's valid:

What we want to do now is if there's no valid JWT token, so we go into the false flow, request a new token, this will be done using a webservice. If there's a valid token, don't do anything and simply proceed.
Login mutation
Navigate back to the BB Data API webservice that we created and add a new endpoint to the webservice called 'Login mutation'. The HTTP method we'll use is POST and the path is '/api/runtime/[APPLICICATION_UUID]', make sure to select a new template as the last option.

Save the endpoint and edit the template by naming it 'Login mutation template'. Copy the following liquid code:
The username and password are the global variables we created earlier, we'll add those later via the sub-action. You can find the authentication_profile_uuid by going to the authentication profile tab and clicking on the authentication profile you want the UUID of. It'll then show the UUID as the last part of the URL.

With this created, let's head back to the sub-action.
Finishing the sub-action
Add a new HTTP request action step in the false flow. Select the 'BB Data API' webservice and the 'Login mutation' as endpoint. Rename the response as to 'login_response'. Add the username and password configuration as variables. Make sure they have the configurations as kind and you'll be able to select them from the drop-down menu.

Now that that's done we should receive a response in which we can retrieve the new JWT token if a valid token hasn' already been found.
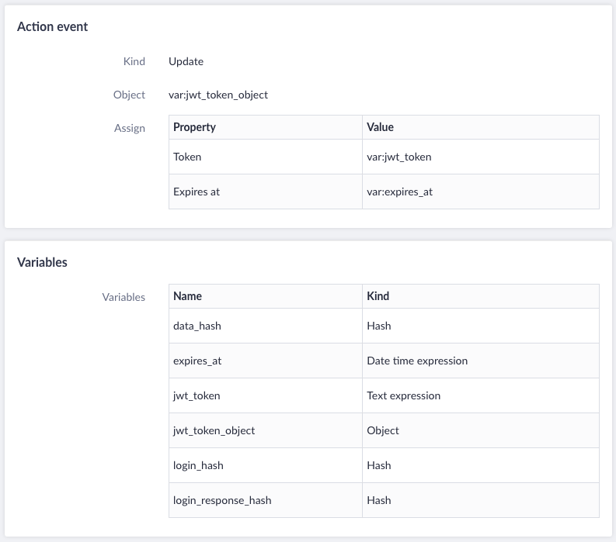
We can now update our JWT token by fetching the response we get. Create a new update action step.
Add a the following hash variables:
-
'login_response_hash' with the value: var:login_response
-
'data_hash' with the value: fetch(var:login_response_hash, "data")
-
'login_hash' with the value: fetch(var:data_hash, "login")
Add a Date time expression variable:
-
'expires_at' with the value: fetch(var:login_hash, "AccessExpiresIn")
Add a text expressions variable:
-
'jwt_token' with the value: fetch(var:login_hash, "jwtToken")
And finally, add an object variable:
-
'jwt_token_object' select the JwtToken model and filter it with ID exists
We can now update the JWT token record we have with the updated token we receive from our response. Select the newly created jwt_token_object to be updated in the step. Update the token property and the expires at property.
The new token property will be the jwt_token variable we created.
The expires at property's new value will be the expires_at variable we created.
Create the action to make the API call
Let's add the final action to create the API call and trigger our action. So add a new action called 'Trigger next-gen file upload' and make sure to uncheck the background checkbox. Add a Text input variable called file_url this is the piece of media we'll send to the action to be uploaded to our Media model.
Now to build this we'll start off with adding a Sub-action step, specifically the [BB] Login Data API action.
The next step is to execute the webservice we created earlier. Make a new step using the HTTP request step and select 'BB Data API' as the webservice and select the '[Next gen] File upload' as the endpoint. We need to add the bearer token as a variable for the webservice to work. We can do this by first retrieving the JWT token and then creating a text expression to turn it into a proper bearer token.
Add a new object variable called' jwt_token_object' in which we'll use the JwtToken as the model and filter on if ID exists.
Now add a text expression called 'valid_bearer_token' with the following expression:
This will result in a valid bearer token for our action. We can now set this variable as the value of the bearer_token webservice variable.

And that's it!
Test it out
Feel free to run the action in the classic environment by pressing 'Run', and give an URL to an image like so:
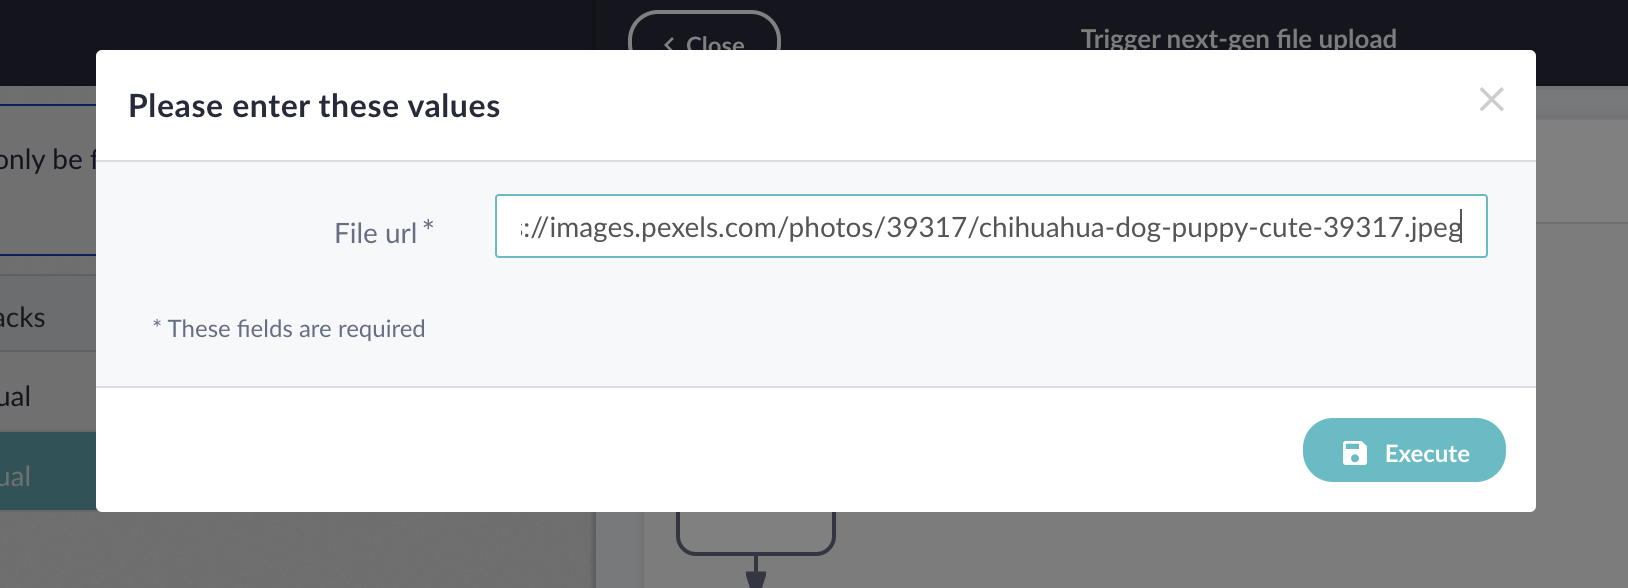
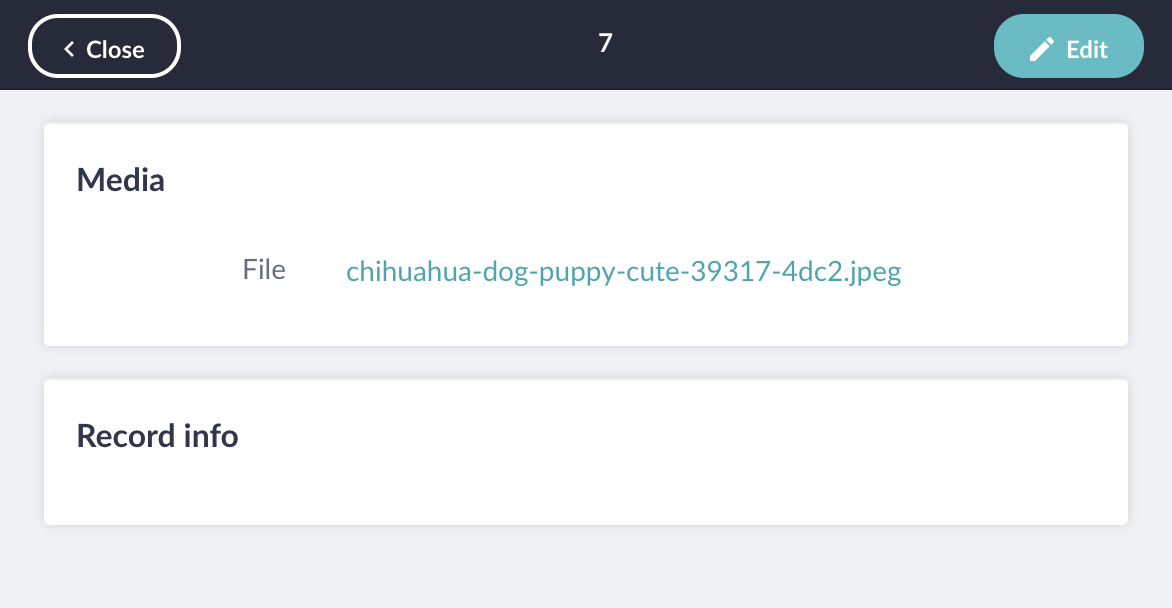
What happens now is this action will execute, it will check if a valid jwt token is present, which won't be the case so a new one will be created and it will update the single record we got. After this it'll do a post request to our action, this action will create an asset link to our URL and create a new record. You can create a new page and show all your newly added Media records there (don't forget to change the permissions for this model). Or if you used the classic environment to call the action you can check the back office quickly, resulting in:
