User Provisioning
Prerequisites
-
Access to FusionAuth with appropriate permissions.
-
Identity Provider configured and working.
Configuring User Provisioning
-
Access user provisioning settings:
Navigate to the settings tab of the customer.
-
Configure provisioning connector keys:
Ensure all provisioning connector keys are configured properly.
-
Enable user provisioning:
Activate user provisioning by toggling the switch.
-
Automatic role assignment:
Once enabled, user provisioning will automatically assign and remove roles to users.

Configuring Identity Provider
-
Access identity provider settings:
Go to Settings -> Identity Provider.
-
Edit identity provider:
Locate and edit the configured Identity Provider.
-
Add scope for roles:
Ensure a scope is added to retrieve roles from the Identity Provider.
Examples of scopes include Roles, Groups, UserManagedRoles, or a custom key defined for the Identity Provider.
Configuring Webhook in FusionAuth
-
Access webhook settings:
Navigate to Settings -> Webhooks.
-
Edit webhook:
Select and edit the configured webhook.
-
Configure events:
Enable the events
user.create.completeanduser.login.success.Save the webhook settings.
Configuring Tenant in FusionAuth
-
Access tenant settings:
Go to Tenant in FusionAuth.
-
Edit tenant:
Edit the corresponding Tenant (e.g., Betty Blocks).
-
Configure webhooks:
Navigate to the Webhooks tab.
Ensure that the checkboxes for
user.create.completeanduser.login.successare checked.
Configuring Lambda in FusionAuth
-
Access Lambda settings:
Go to Customizations -> Lambdas.
-
Edit Lambda:
Locate and edit the lambda configured in the Identity Provider (likely named Betty OpenID reconcile lambda).
-
Debugging Lambda:
Enable debug mode on the lambda.
Log in as a user to generate logs.
-
View logs:
Access System -> Event Log to view the logs of the logged-in user.

-
Troubleshooting
If roles are not visible, add additional debug lines to the lambda function.
-
Assign roles:
If roles are found, add the following lines to the lambda function, replacing
role_keywith the appropriate key:if (jwt.role_key) {
user.data.roles = jwt.role_key;
} else {
user.data.roles = [];
} -
Save and test:
Save the lambda and test logging in again.
If user provisioning is enabled, roles should now be automatically assigned based on the configured keys.

Conclusion
Following these steps ensures that user provisioning is properly configured in FusionAuth, allowing for seamless role assignment and removal based on user login credentials.
FusionAuth Identity Provider
Prerequisites
-
Access to FusionAuth and Synapse with appropriate permissions.
FusionAuth Configuration
-
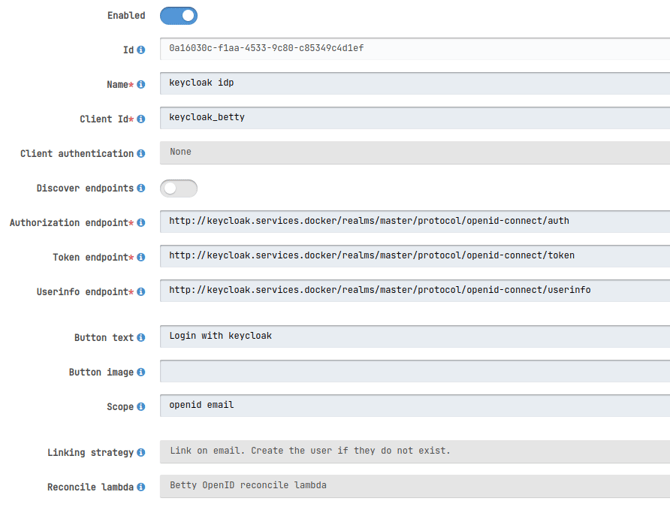
Access FusionAuth Settings: Navigate to Settings -> Identity Providers.
-
Create identity provider:
Click the button on the Top Right and select OpenID or SAML v2, based on your requirements (in this guide, we use OpenID).
Fill in the required fields.
At "Reconcile Lambda," choose the appropriate reconciliation lambda function (e.g., Betty OpenID reconcile lambda).
Save the Identity Provider. Note down the Identity Provider ID for later configuration.
-
Configure callback URL:
Ensure that the redirect/callback URL is set to
<http://<domain>>/oauth2/callback.This URL can be found in the pop-up when clicking on the view icon.
Synapse Database Configuration
Mandatory Configuration
-
Update customer_identity_providers table:
In the
customer_identity_providerstable, add a new record with the following details:-
customer_id: Found in the customer's table. -
description: A description of the Identity Provider. -
active: Set to 1. -
type:designtime -
fusionauth_idp_uuid: Set to the ID of the Identity Provider created in FusionAuth. -
inserted_atandupdated_at: Set to the current timestamp.
-
- Note ID: Note down the ID of the new record created.
Non-Mandatory configuration
-
Update customer_domains table:
In the
customer_domainstable, add the email domain used for automatic redirection during login. -
Update customer_domain_identity_providers table:
Connect the Identity Provider to the domain in the
customer_domain_identity_providerstable.

Sync identity provider
-
Access control panel: Visit the control panel URL
(e.g.,
<https://synapse.<domain>>/control-panel). -
Navigate to Customers:
Go to Customers -> Index.
-
Select Customer:
Choose the appropriate customer.
-
Verify configuration:
Ensure that the Identity Provider is configured correctly.

-
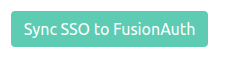
Go to identity provider
Click on the DesignTime Identity provider
-
Sync SSO to FusionAuth:
Press the "Sync SSO to FusionAuth" button to synchronize the Identity Provider.
Conclusion
Once the synchronization is complete, new apps should immediately work with Single Sign-On using the configured Identity Provider.