The MCP server feature allows your Betty Blocks applications to securely expose business data and workflows to AI clients such as those provided by Microsoft, OpenAI, and Anthropic. This enables AI assistants to access structured, governed context from your application instead of relying only on general knowledge.
Why use an MCP server?
By default, AI clients do not have access to your internal data, logic, or workflows. This creates a context gap, where AI responses are based on assumptions rather than actual business information.
Using an MCP server solves this by allowing AI clients to:
-
Read relevant business data from your application
-
Execute predefined actions and workflows
-
Follow your business logic and definitions
-
Provide responses based on real, current application state
This improves accuracy and makes AI outputs relevant to your organization.
How it works in Betty Blocks
Betty Blocks allows builders to configure an MCP server directly from the platform without custom integration code. Builders can:
-
Expose folders of Wasm actions as MCP actions
-
Control which data and operations are available to AI clients
-
Apply governance by filtering and restricting access
-
Update logic visually without modifying integrations
Once configured, external AI clients can connect to your application through the MCP protocol and use the exposed actions and data. MCP Service folders connect to external services via the Model Context Protocol.
Create a new MCP server
In the Actions, you can create a special folder that acts as an MCP server. This allows external AI clients to access and execute selected Wasm actions from your application.
To create an MCP server:
-
Open the Actions section. Then click
+in the appearing sidebar > Wasm Action > Select folder > Create new folder -
Another way is via Actions overview > Folders
+and click MCP Server

-
Select MCP server as the folder type and enter the following details:
-
-
Name – identifies the MCP server
-
Description (optional) – explains the server’s purpose
- Private MCP server – restrict access by choosing a default authentication profile (profile type explained below)
-
After creation, the MCP server generates a host URL. This URL is the endpoint used by MCP clients to connect to your application. You can copy this URL and use it when configuring the client connection.
The MCP server is exposed on a dedicated endpoint, for example:
/api/mcp/<mcp-server-id>
Any Wasm action placed inside this MCP server folder becomes available to connected MCP clients.

Assign actions to an MCP server
You can assign actions to an MCP server when creating or editing an action.
To assign an action:
- Create a Wasm action
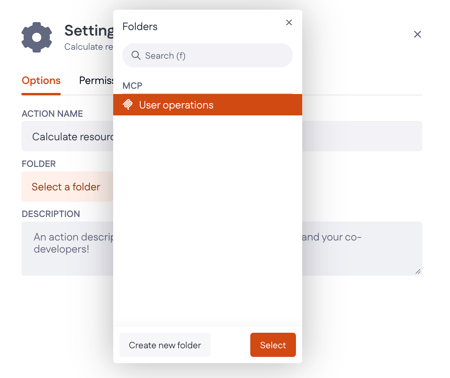
- In the Folder field, select the MCP server
- Save the action

For existing Wasm actions, open the action’s Settings tab, click Select a folder, and then choose your MCP server.
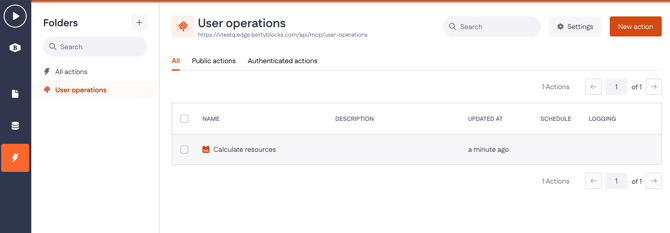
The action is now exposed through the MCP server and can be executed by connected clients.
You can assign multiple actions to the same MCP server to expose a group of related operations.
Manage MCP servers
MCP servers appear in the folder list in the Actions IDE sidebar. From there, you can:
- View all MCP servers
- Create new MCP servers
- Organize actions within each server
- View which actions belong to which server
This allows you to control which application logic is accessible externally.
Once configured, external AI clients can connect to your application through the MCP protocol and use the exposed actions and data.
MCP folder permissions
Each MCP server folder and the actions inside it can have their own permission level. When they differ, a specific inheritance rule determines which permission applies.
To set up folder-level authentication, first create an API key authentication profile. Go to Tools > Authentication profiles > New profile > API key, enter a name, and the configuration is created automatically.

| Folder permission | Action permission | Result |
|---|---|---|
| Public | Public | Public |
| API key | Public | API key (inherited from folder) |
| API key | Private | Private (any authentication profile is valid) |
| API key (profile A) | API key (profile B) | Profile B |
| Public | Private | Private (uses action's authentication) |
| Public | Userpass | Userpass (uses action's authentication) |
The folder permission acts as a default. If an action is set to public, it inherits the folder's authentication profile – unless the action has its own profile defined, in which case that takes priority. A private action always falls back to its own authentication setting, regardless of what the folder is set to.
Example use cases
After connecting an AI client to your MCP server, users can:
-
Check inventory availability using live application data
-
Analyze internal reports using existing business logic
-
Trigger workflows such as approvals or status updates
-
Retrieve structured information from application models
All responses are based on your configured data access and action definitions.