The Export function gathers data from your data model and stores it in a CSV/XLSX (spreadsheet) document. To use this function, click here to download it from the Block Store.
The Export to CSV/XLSX step will be listed inside your actions under “utilities” when added to your application.

Using Export step
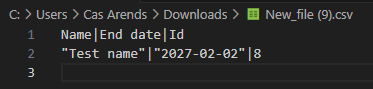
Let's say we have an application where we can add projects. A project has a name, ID, and an end date. As the owner of the application, I want to download all the data of the projects added by the users. To do this, I can add an Action button to the application. inside of the action, I’ll add the “Export to CSV/XLSX” step. This will result in all of the data gathered and ready for export to my downloaded files. Here is how you can set it up:
Type

The type is based on your preference, the data we will import is going to be saved in a CSV or an Excel document -choose the one you want here. In this example, we’ll use the CSV.
Model to export records from
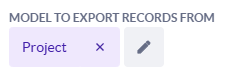
Select the model that your data is sourced from, noting that the data will be specified later. We want to gather all the projects, so that is the model we’ll select.
Filter + Variables
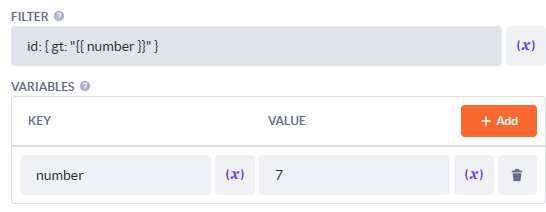
In the filter section, we can filter our data using Javascript. We first specify which value we use to filter, in this case, “id” (use the database name). After that, we use “gt” to specify “greater than” followed by “number” which we will assign a number to at the “variables” part. As we aren’t interested in the first seven projects, let’s leave them out by setting the filter to greater than 7.
Note: To find the database name, go to the data model’s properties, and look for the “Database name” column.
Delimiter
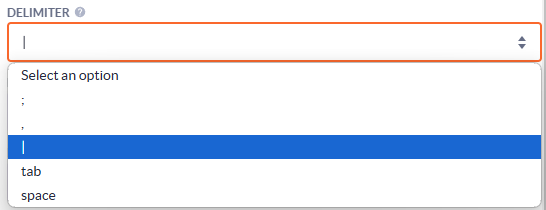
The delimiter is placed between different variables to indicate a new variable. The ‘|’ is a nice and clear symbol to divide our data so let's select that one, but that is just personal preference.
Model + property to save file into
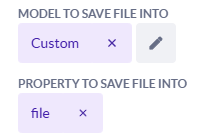
Select the data model you want to save the file into, the property has to be of the type “file”. In this example, we have created a “Custom” with a file property, that way I can save the projects in there.
File name

Add the name you want to give your file.
Property + format mapping
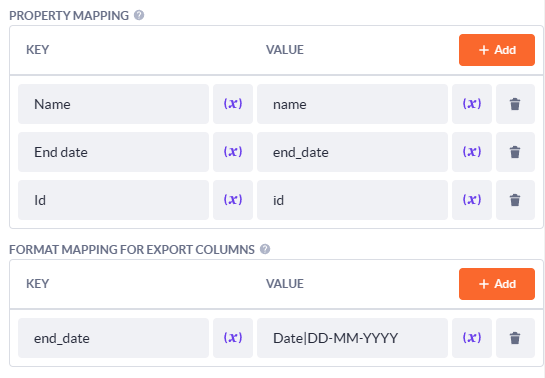
Here you need to select every property you want to add to the file. In this example, we’ve added
- Name
- End date
- Id
These are the only properties the projects have.
The key is the name you want to give the column in your file, the value is what will be added in this column.
The value has to be the database name which can be found in the data model.
The date needs to be provided with a format. This is the same for:
- Price
- Time
- Decimal
(Hover your mouse over the question mark for more explanation about these types).
The key needs to be the same as the value given in the previous part, in the value we say the type “Date” and provide the format DD-MM-YYYY.
Don’t forget to add | between the format and “Date”.
Bom + As
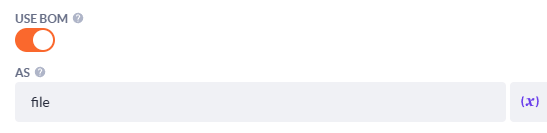
Always turn on “Bom”, this will help Visual Studio Code for example to understand the type of file, as this will prevent reading errors.
Lastly, provide a name to the output so we can use it in the next part.
Now we have set up our export step correctly, the only thing left to do is add the file to our “Custom” model mentioned earlier.
Create file
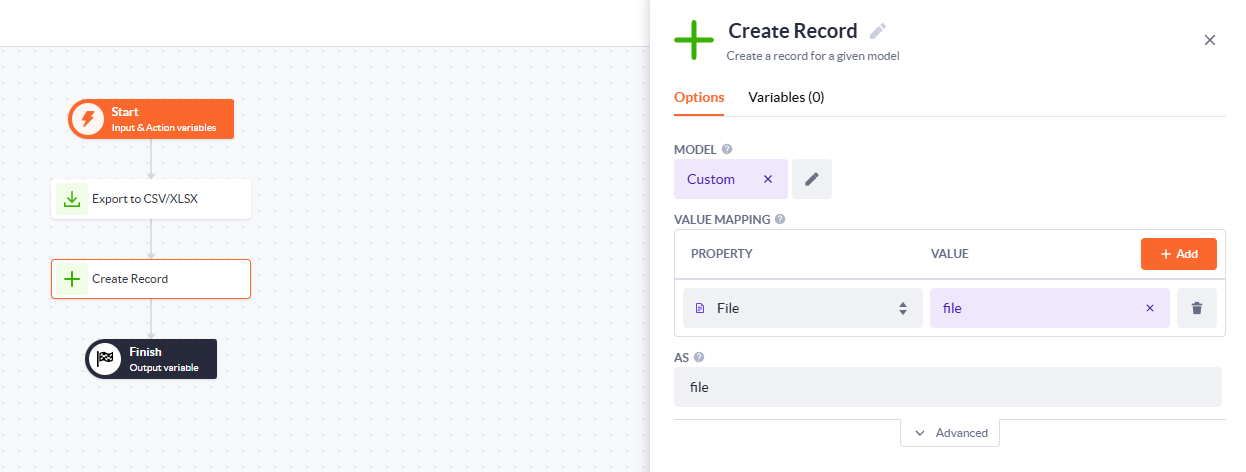
Add a “Create Record” to your action with the model and property where you want to add the file. Add the file to the value column (The name you’ve put at the bottom of the export step).
Create and open file
After compiling the application, we can now press our newly made action button, this will result in creating the CSV file we want. To download the file you can go to the back office of the model it has been saved in, click on the info icon, and then open file.