Actions are made to automate processes and provide logic in your application. The logic is executed when certain events are triggered: a user clicks a button or sets the timer for some event to happen at the exact time. You can create your own workflow in the action builder by adding action steps. Action steps will serve as a logical construction as the events will be carried out on conditions you set yourself.

An example of the flow where input gets successfully checked through the condition step and updated.
Steps and action flow
The construction of action events that are executed within your actions is called action flow. As you build an action flow, it consists of action step sequences. Betty Blocks provides a set of action steps out of the box to compile the action flow.
Action steps are aimed to perform various inputs, many of which are variables, and interactions between components. Their functionality is divided into such categories as Authentication (Authenticate User), CRUD (Update, Delete, Create Record), Debugging (Log Message), External (HTTP(S)), Flow (Loop, Condition), and Miscellaneous (Upload File).
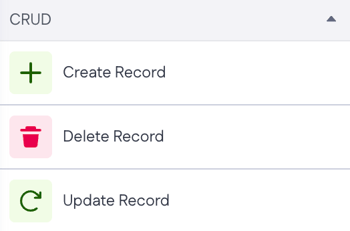
CRUD category of action functions that are ready to use by default.
Action steps are functional units, a logical construction of your action flow. By default, the action flow consists of Start and End steps, further, you add a series of steps between these two points using AI agent or manually. The order in which events are applied provides the logic of the workflow. Each action step has its own purpose and affects the overall action flow.
More about building actions in this article.
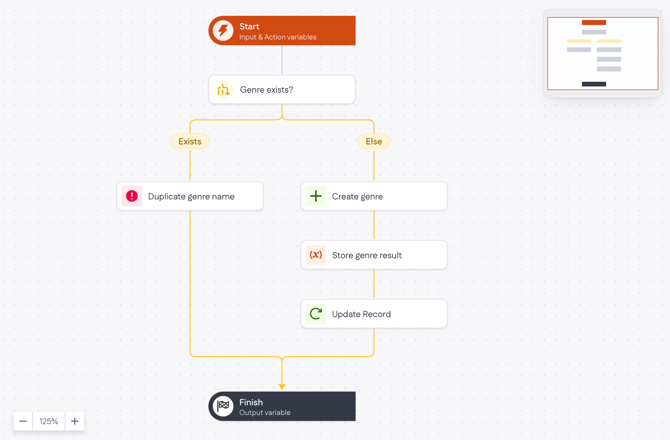
In the following example, we set a condition for adding a new music genre to the app. If the genre already exists, the action displays the error message "A genre with this name already exists." Otherwise, the new genre is created, stored, and updated in the database.
Native actions and Wasm actions
Betty Blocks offers two types of actions: native actions and Wasm actions. Both use the same builder and the same idea of an action flow. What differs is where the logic behind each step comes from.
Native actions (also referred to as Next-gen actions) are built from the action steps that come with the platform – Create Record, Condition, HTTP(S), Loop, and the rest. They run on JavaScript underneath, but you never write any: the logic sits on the platform, and you shape it through options and variables. For most applications, this is all you need.
Wasm actions open the builder up to your own code, in a language of your choice. A developer writes logic in any language that compiles to WebAssembly – Rust, Python, C#, Java, Go – and uploads it as a .wasm component. From that point on, it appears in the steps menu like any other step, so you can drag it into a flow and configure it without touching the code behind it. Write it once, reuse it as often as you like.
Wasm actions extend native actions rather than replace them. Actions you already built keep working exactly as before. More information in What is Wasm-based action builder?
Inside the action builder
When you open an action, the builder splits into three areas.
On the left is the action steps menu (A), grouped by category: Authentication, CRUD, Data, Debugging, External, Flow, and Miscellaneous. Use the search field at the top to find a step by name, or the Add more action steps button at the bottom to bring in more. In Wasm Actions – Add custom Wasm step.
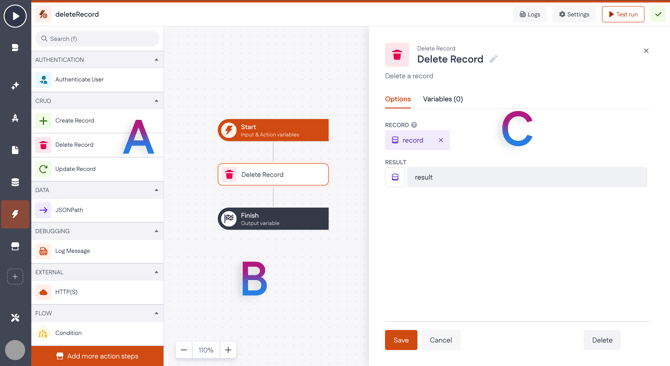
In the middle sits the canvas (B), where your action flow takes shape. Drag a step from the menu onto the canvas and drop it into the flow between Start and Finish. Zoom controls in the bottom-left corner help when a flow grows long.
On the right, a configuration panel (C) opens as soon as you click a step on the canvas. It has two tabs: Options, where you set what the step works on (for an Update record step, that means the record and the value mapping between properties and their new values), and Variables, where you define variables the step can use. Save when you're done, or delete the step from the same panel.
Actions menu
Logs. Logging is off by default. Turn it on under Settings > Logging, and the action records detailed run data for 7 days before switching itself off again to keep your app performing well. The Logs button then opens the overview of runs for this action, where you can see what happened and jump straight to the step that caused an error. Logs stay available for at least 90 days, and you can reach them all through Tools > Logs.

Settings. Four tabs for native actions:
- Options — the action name, the folder it lives in, and an optional description for your co-developers.
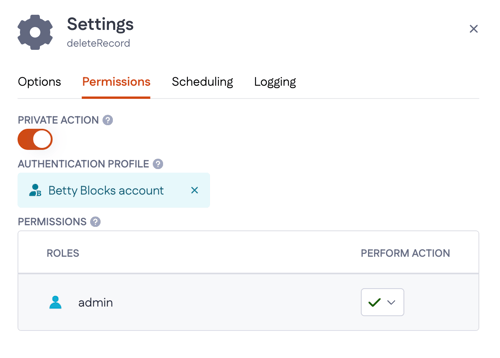
- Permissions — the Private action toggle, an authentication profile, and which application roles are allowed to perform the action.
- Scheduling — turn an action into a scheduled action and set when it runs, using cron syntax.
- Logging — the switch described above.
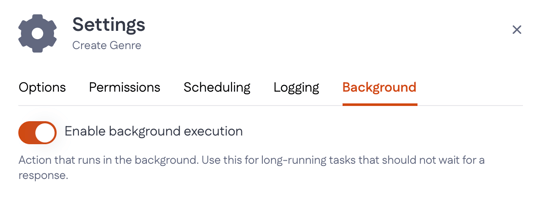
Wasm actions add a fifth tab, Background. Enable background execution when an action takes a while — a data import or a bulk update, for example — and the caller gets control back immediately instead of waiting for a response. Note that background mode stops the action from blocking; it doesn't extend the 10-minute limit.
Test run. Runs the action so you can check it before putting it in front of users. What you see depends on the action's visibility: public actions offer a Basic and an Advanced input mode, where you fill in property values by hand or paste in test data. Private actions are tested through the GraphQL playground and need authentication first. The result comes back as JSON — on a successful run, the output variable from the Finish step; on a failed one, the error. Keep in mind that a test run executes the real logic, so records in your database really are created or changed.
More about running tests in Testing and debugging an action article.
The icon at the end of the toolbar shows whether your changes are live. A green tick means the action built successfully and everything you've changed is already running in your app.

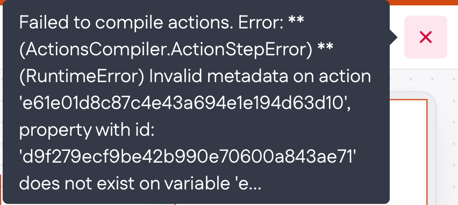
A red cross means something went wrong and your changes aren't live — hover over it for a short description of the issue, then open Logs for the full details.
Adding actions
Actions aren't always built by hand. Some are generated for you as you work in the page builder: add a component that needs logic, and the action flow comes with it. In the example below, we added a Create Form, and the Create Record action was generated automatically.
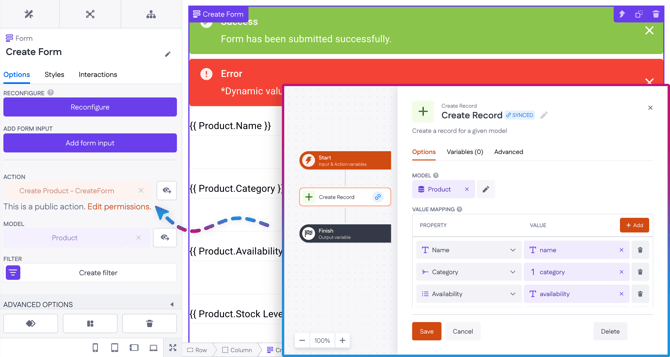
An Update Form works the same way and gets an Update Record action. The form and its action also stay in sync — change the input fields on the form and the action updates to match, so you don't have to rebuild the flow yourself.
Building actions with Betty Genius
You can also describe what you need and let Genius build it. Open Genius from the builder bar and explain what the page should do — or what several pages should do together. For example:
A page where employees submit expense claims with an amount, a date, and a receipt. Then a second page where their manager sees all open claims and can approve or reject them.
Genius builds the pages and the actions behind them, and you can open and adjust them afterwards. Every action Genius generates is a Wasm action.
Custom steps
Actions aren't limited to the steps that come out of the box. Developers can build their own action steps or add ready-made ones from the Block Store, and those show up in the steps menu next to the native ones.