Authenticate user step
Learn about the Authenticate user step: its characteristics, options, and common use.
After reading this article, you’ll know:
-
What the Authentication step is and its major options
-
How to use the Authentication step in your application
What is Authenticate user step?
Authenticate user action step enables end-users of your application to log in and execute private actions. Usually, it is applied when a user needs access to some specific functionality in an application.

The Authenticate user step is automatically included in the action that is generated when a user drags the login form component onto their page canvas. Have a look to see how that action is generated to gather inspiration!
Options
The Authentication user step can be configured with the following options:
-
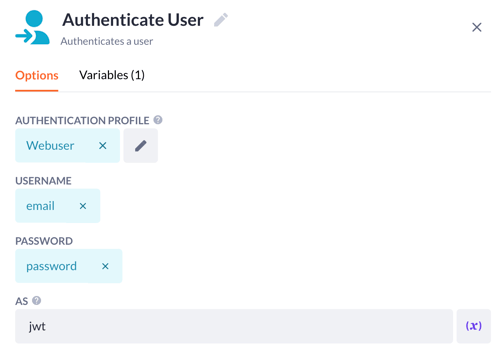
Authentication profile. Here you can add currently supported authentication profiles. See the Authentication profiles page for more information.
-
Based on the chosen authentication profile, the builder is able to configure the inputs for the profile:
-
User name and password: the variables containing the username and password which will be used to authenticate the end-user. Shown if the builder chose to use the username/password authentication profile.
-
Record ID: the variable containing a record ID of the user to be authenticated. Shown if the builder chose the custom authentication profile.
-
-
As. State the name of the variable containing the result of the authentication execution.

Using Authenticate user step
The Authenticate user step is a necessity if you are using a username/password or custom login in your application.
In this example we are looking at a username/password login, to set this up we need a few things:
-
Webuser model that covers the properties of your login, like a text-based username and a password property to safely store a password in
-
Authentication profile
-
Login page, based on a page template (Login flow) or self-made!
-
The login page contains a Login form, which passes the necessary user information to your action
-
-
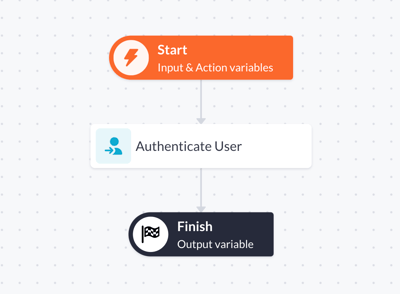
Authenticate user action: from your form, a username and password will be parsed to your action. The Login form component will create and connect these for you in the Authenticate user step
-
With a custom form, create the input variables in the input segment of your action
-
-
View the Authenticate user step, and assign the username and password variable to the corresponding fields in the action step options. Set a value for the AS field, as it will be the return value of the user login
-
Set the return value of the Authenticate user step as the output variable in the Finish step
Once the action has been created and the settings configured, you can use the login to allow users to access your application. To add these users to your application you can either use a register page template or create one yourself, for more information on that see our article on creating the register functionality for webusers.
Authenticate user step is a unique step and is necessary for a secure application, so make sure you dive into testing its capabilities and provide a safe online environment!