After reading this article, you’ll know how to:
- Trigger an action through an external HTTP request
- Work with incoming request data inside an action
- Secure and validate incoming requests
Overview
Next-gen actions can be called directly from outside your application. This is useful when another system needs to push information into Betty Blocks—for example, a payment provider confirming a transaction or an IoT device updating a status using a webhook.
To make this possible, an action can accept the incoming request via a specific input variable and respond with the data and status code you define.
Getting started
Before you begin, install the Endpoint utility functions block from the Block Store. This block contains the Format endpoint result step, which is required to send a proper response back to the external system.
For testing your endpoints, we recommend using a tool such as Postman.
Preparing your action
Add the request variable
Start by creating a new action. In the Start step, you must add an input variable with the following configuration:
- Name:
request(Note: This name is mandatory. It is the key identifier that tells the action to treat the incoming payload as data). - Type: Custom Object
This variable will hold the full incoming HTTP request, including headers, the body, and path segments.
Creating a schema model (optional)
If you want to work with typed fields, you can connect the request variable to a Schema Model. This lets you reference individual fields in later steps without needing to guess the structure manually.
Important: The request body is received by the action as a stringified value. If you create a Schema Model for the request variable, the property corresponding to the body must be set to Text (single-line). If you attempt to define it as an object immediately, the mapping will fail.
Understanding the endpoint URL
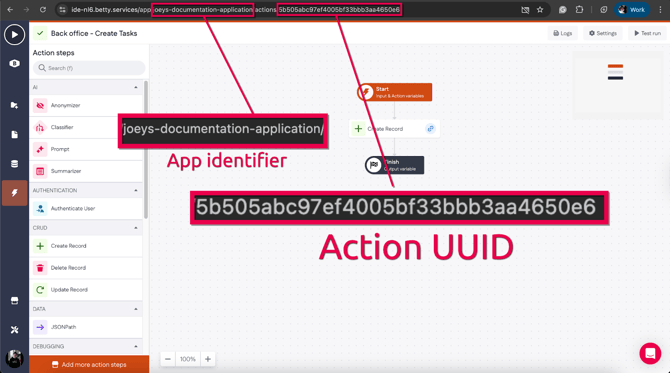
Every action receives a unique endpoint URL that you can call from external systems. The URL has the following structure:
https://<app_identifier>.betty.app/api/runtime/<app_uuid>/action/<action_uuid>
<app_identifier>: Your application's unique name/identifier.<app_uuid>: The UUID of your application instance. (If you don’t know how to get your app’s UUID, check out this article).<action_uuid>: The specific ID of the action you are editing.
Note: The ability to specify a custom endpoint URL is not yet supported. The URL is automatically generated upon endpoint creation.
Once you have the full URL, you can send requests to it (e.g., using Postman), providing the body and headers expected by your action.
Reading the incoming request
Once the request variable captures the data, you need to process it to make it usable.
- Parsing the Body Because the body is received as a string, you generally need to convert it into a usable object.
- Use the JSON Path step that comes with the Endpoint utility functions to convert the stringified body text into a JSON object.
- You can then map this object to a new variable to access specific properties (like
order_idorstatus).
- Accessing Headers To access specific header values (such as authentication tokens), use the JSONPath function block. This allows you to traverse the request object and extract specific header strings.
Example: If you need to filter for a specific credential from a list of headers, you can use a path expression like the one below to locate the Authorization entry:$.headers[?(@[0] == "authorization")][1] - Security and Validation Security Note: endpoints are publicly accessible endpoints. It is critical to implement validation logic within your action. You should add a Condition step early in your action flow to validate the request. This typically involves checking for specific values in the headers (e.g., a secret token or API key) to ensure the request is authorized and comes from a trusted source.
Processing the request
Once the data is parsed and validated, you can add any logic your endpoint needs:
- Creating or updating records
- Calling other actions
- Sending emails
- Applying business rules
For example, if you receive order details, you might use a Create record or Update record step to store the information in your database.
Returning a response
To finish the endpoint properly, you must return a response to the external system. Without this step, callers will receive a generic error, even if your internal steps ran correctly.
- Add the Format endpoint result step to the end of your action (found in the Endpoint utility functions).
- In this step, define:
- Status code: (e.g., 200 for success, 400 for bad request).
- Headers: (e.g., "Content-Type": "application/json").
- Body: The data object you want to return to the caller.
- Give the output variable a name (e.g., requestResult) and add it to the Finish step of the action.
Sending a request
Open your Postman tab and send a request to your action’s URL. If everything is configured correctly, you will receive the formatted response you defined, along with the correct status code and headers.
This confirms that the endpoint is working and can now be used by external systems.
Handling conditional responses (success vs. error)
A robust endpoint shouldn't just return a 200 OK status if something goes wrong. If your validation fails (for example, if the authentication header is missing), you should return a 400 Bad Request or 401 Unauthorized status.
To achieve this, you can make the status code dynamic based on the flow of your action:
1. Define the default status: In your Start step, create a Number variable (e.g., statusCode) and set the default value to 200. This ensures that if the flow proceeds normally, the response is marked as successful
2. Add your validation: Add your Condition step to check the headers or body (as described in the Reading the incoming request section).
3. Handle the "bad" flow: If the condition fails (the false path), you need to update the status code.
-
- Add an Expression step inside the False flow.
- Set the expression value to 401 (or whichever error code applies).
- Map the output of this step to the same statusCode variable name used in the start step.
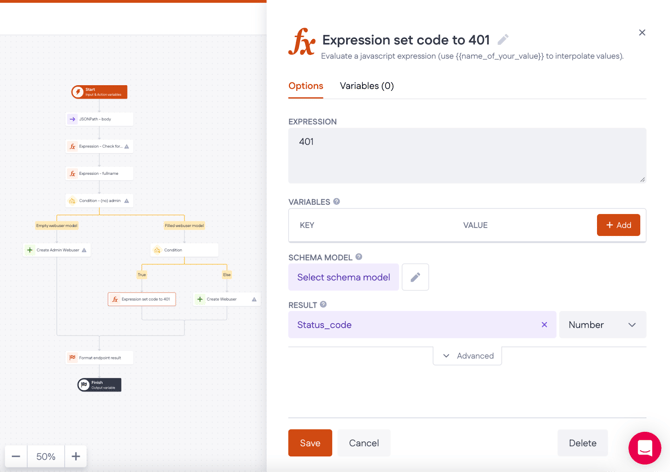
4. Finalize the response: When you reach the Format endpoint result step at the end of your action, do not hardcode the Status Code. Instead, select your statusCode variable. Now, the endpoint will automatically return 200 for valid requests and 400 for invalid ones.

Note: You can apply the same logic to the Response Body. You might define a responseBody variable with a success message at the start, but overwrite it with an error message (e.g., {"error": "Invalid API Key"}) within the False flow.