Mutation logging is beneficial for tracking which records have been created, updated, or deleted. While this feature was available in Betty 5, implementing mutation logging in Next-gen involves additional steps.
Create the Log model
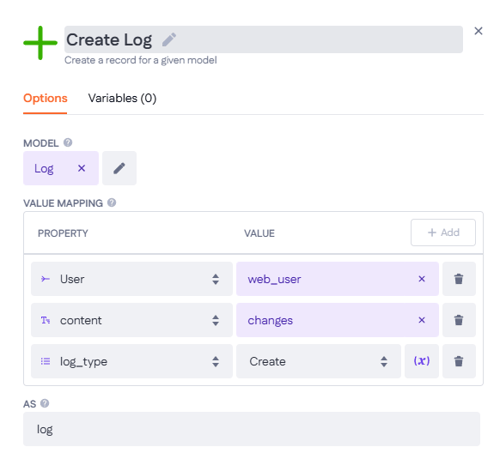
To begin, we must create our Log model. This model serves to display who made changes and what alterations were made:

The model has 2 properties:
- Content
This property contains the JSON content of the changes that have been made.
- Log type
This property describes what type of log it is. It can be Create, Update or Delete:

The model should also have a relation to the User model. A user should be able to have multiple logs, so this should be a Belongs to relation. This relation will be used to show who the auditor of the log is.
Create the remote model
The second model we need is our own remote model. This model will act as a portal to exchange information about our tracked changes with our data table in the back office later on.
To make our custom remote model, we need to provide a JSON file. To do this, we make a new public repository on GitHub.

In the quick setup section, click creating a new file and create a new JSON file.

In the new JSON file, add the following JSON:
{
  "swagger" : "2.0",
  "info": {
    "title": "Audit Log",
    "description": "Returns the differences between new and old",
    "version": "1"
  },
  "basePath" : "/swagger-audit-log",
  "tags" : [ {
    "name" : "Swagger Audit Log"
  } ],
  "schemes" : [ "http" ],
  "paths" : {
    "/request": {
      "get" : {
        "tags" : [ "Log", "Diff" ],
        "summary" : "Returns the differences between new and old",
        "description" : "",
        "produces" : [ "application/json" ],
        "responses" : {
          "200" : {
            "description" : "successful",
            "schema" : {
              "$ref" : "#/definitions/AuditLogDifferences"
            }
          }
        }
      }
    }
  },
  "definitions": {
    "AuditLogDifferences": {
      "type": "object",
      "properties": {
        "Label": {
          "type": "string"
        },
        "New value": {
          "type": "string"
        },
        "Old value": {
          "type": "string"
        }
      }
    }
  }
}
After creating the JSON file, click the raw button in GitHub. This will send you to a page that only contains the JSON:
![]()
Copy the URL of your RAW page.
In your application, add a new model and create a data source:


You can now select your data source as a new remote data source:

This will automatically create 5 new actions for your remote model.
Create the schema models for your remote model
We need a schema model for the skip and take parameters. These parameters will be used by your data table later:
AuditLogDifferences
|
name |
type |
|
skip |
number |
|
take |
number |
|
Auth_info (optional) |
relation (to the AuditLogDifferences > Auth params Schema model) |
You can optionally add authentication to your mutation logging feature. For this, we need the following Schema models. It’s recommended to give these descriptive names:
AuditLogDifferences > Auth params
|
name |
type |
|
auth_profile |
Text (single-line) |
|
raw_jwt |
Text (single-line) |
|
user_id |
Number |
JWT authorisation
|
name |
type |
|
auth_profile |
Text (single-line) |
|
roles |
Text (single-line) |
|
user_id |
Number |
|
exp |
Number |
Retrieve data from your remote model
In your actions, find the action called all for Remote Model AuditLogDifferences and open it. This action is responsible for retrieving the changes from your remote model. To make it work properly, we need to add a few action steps:
1. In your input variables, add the AuditLogDifferences Schema model to your params variable:
2. Install the JSONpath block in your application and drag the JSONpath step into your action.
3. Add your params variable as Data to the JSONpath step, and add the following code to the jsonpath field:
|
$..filters[0].value |
Set the result variable to log_item_id of type number.

4. Install the Audit log block and drag the Return audit log step into your action.
5. Add a Log object variable called log_object to the step and give it the following filter: id equals log_item_id

6. Add the log_object as the Record
7. Assign params.skip to the Skip option and params.take to the Take option.
8. Add content as property name. this will make sure the action uses the Content property of the Log record

Create logs
To track changes and create logs, go to an action of which you want to track changes (for example a create message action).
- Add the Track changes step from the Audit log block and insert it after the create/update/delete step of your action.
- For delete and update steps, set the Before Updating option to the Record variable. For the Create, Update and Delete steps, add the result variable as the After Updating option and save the output as changes:
Track Changes after Update step:

Track Changes after Create step:

Track Changes step after Delete step:

Authentication (optional)
1. Create a new action called [auth] Authentication for logging.
Use the AuditLogDifference > Auth params Schema model to create an input variable called auth_params, which will be a custom object:

2. Drag in a condition step to see if all parameters exist:

If the parameters do not exist, we raise an error. If the parameters do exist, we continue with the following steps:
1. Add a Decode an OpenID connect step with the raw_jwt from the auth_params input variable as the ID token and our JWT authentication Schema model as Schema model. Save the decoded ID token as jwt_auth_info (object):
2. Add an expression step with the following code:
new Date(}) > new Date()
In your variables option, add a variable:
|
key |
value |
|
authentication_expiration |
jwt_auth_info.exp |

3. In the Expression step, create a variable. This variable will be used to check if the user has a role. In our example, we check if the user has the admin role:

The code in this expression step should be:
"" split(","). includes ("")
|
key |
value |
|
admin_role_id |
admin_role.id |
|
roles_array |
jwt_auth_info.roles |

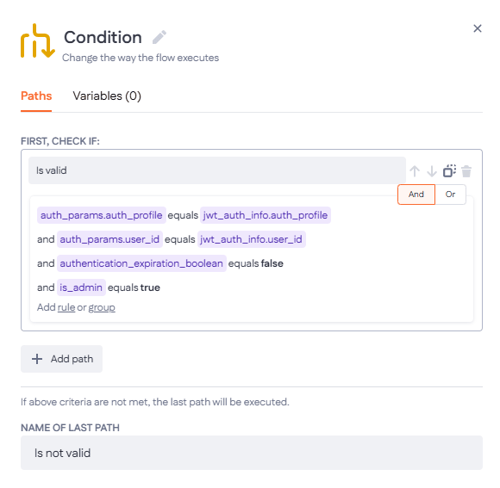
If the condition is valid, continue to the finish step, else throw an error.
Your authentication action should look like this:

This action will only allow users with the admin role to see the changes. To implement the authentication, add it to your all for Remote Model AuditLogDifferences action through a sub-action:


Create the back office environment
To see our logs, we create a back office.
1. Create a new page with the Back office template, and select log as the data model. Add the fields you want to see to your data table (ID, log_type and auditor for example). The page will look similar to this:

2. Remove the new and the update button from this page, since you don’t need them.
3. In your drawer, you can delete the create and update tabs as well.
-
Add a Datatable to the Datacontainer in the detail tab. This Datatable should contain Label, Old value, and New value from your remote data source. Give it a filter where AuditLogDifference.id equals Log.id


This filter will make sure only the changes related to the selected log are shown in the data table.