What is OneSignal?
OneSignal is a powerful, developer-friendly platform for sending push notifications, in-app messages, emails, and SMS to users across devices. It is widely used by developers and product teams to engage users, deliver updates, and automate messaging campaigns.
At its core, OneSignal enables:
- Push notifications on web and mobile (iOS, Android)
- Automated messaging based on user actions or schedules
- Segmentation and targeting via tags, filters, and user properties
- Analytics and delivery tracking
For developers, it provides SDKs, REST APIs, and a visual dashboard to manage campaigns.
Integration workflow
In short, here's how OneSignal integrates with a Betty Blocks PWA:
- Set up a OneSignal project
- Create a OneSignal app
- Enable Web Push platform
- Configure your site details and permission prompts
- Host the required service worker in your Betty Blocks application
-
Serve
OneSignalSDKWorker.jsat your application’s domain and configure theService-Worker-Allowedheader - Configure the path to the service worker in OneSignal
-
- Add OneSignal to your application’s front-end
- Use the OneSignal component on your page
- Initialize OneSignal with your OneSignal app ID and compile the page
- Trigger notifications
- Use OneSignal’s dashboard or OneSignal’s REST API in action flows to send messages
- You can personalize based on user data (e.g., tags like
user_id,role,region)
Set up a OneSignal project
- Go to https://dashboard.onesignal.com and sign up or log in.
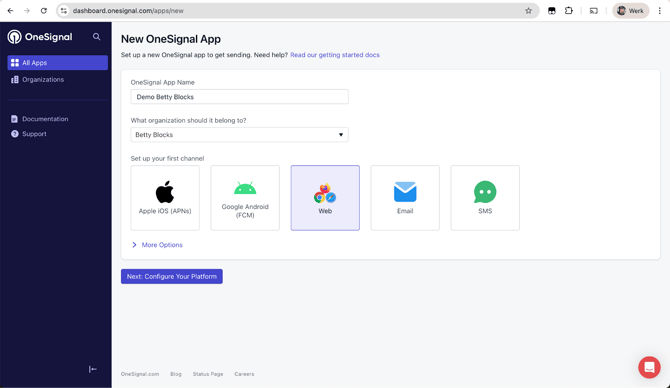
- In the OneSignal dashboard, create a new app. For clarity and consistency, use naming conventions so they’re easy to manage (i.e., the same name as your Betty Blocks application, “Betty App - Production”, “Betty App - Staging”).
- Choose “Web” as the platform for push notifications.
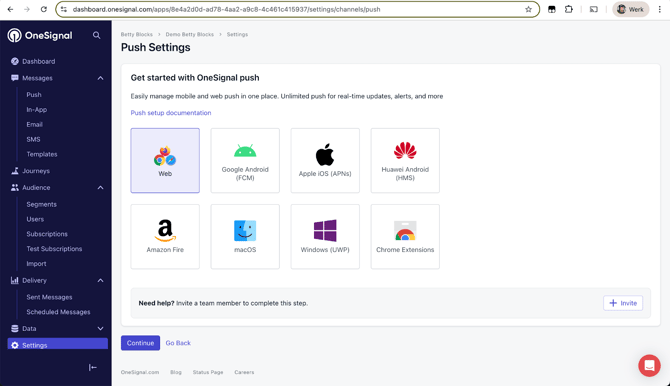
- From the dashboard or via Settings in the menu on the left, begin setting up push notifications. Again, select “Web”, then click “Continue”.
- Select “Typical Site” as the integration type. Enter your site’s name (e.g. the name of your Betty Blocks application) and provide its domain in the format “https://<application_identifier>.betty.app”.
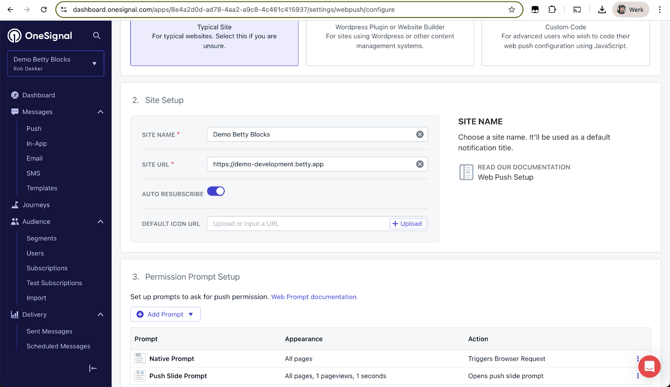
- Choose your preferred (native or soft) prompts. For more information, refer to OneSignal’s documentation on Web Permission Requests.
- In section 5 (“Advanced Push Settings”), we’ll configure a custom path for the service worker later. For now, leave this as-is and click “Save” at the bottom of the page.
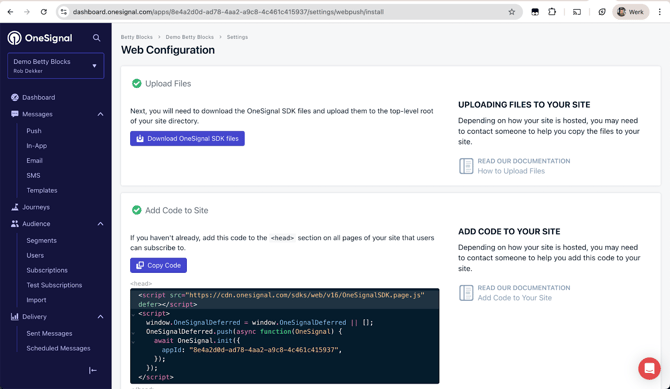
- Click the button to download the OneSignal SDK files. Unzip the package and open the included JavaScript file. Inside this file, locate and copy the CDN URL (e.g., https://cdn.onesignal.com/sdks/web/v16/OneSignalSDK.sw.js). Open this URL in your browser, then copy the content of the file to your clipboard. You’ll use this code in the next step: “Hosting the required service worker”.
⚠️ Important note
Since each OneSignal app is tied to a single origin (domain/URL) for security and subscription purposes, you’ll have to create a separate OneSignal App for each environment. This ensures push permissions and subscriptions are handled correctly by browsers and that you can test features in dev/staging without impacting production data.
Hosting the required service worker
To support web push notifications, OneSignal requires a service worker. However, since you cannot directly upload files to the root of your Betty Blocks application (i.e., “/”), you’ll need to proxy the service worker through an action in your app.
Here's how to do that:
- Create a new public action in your Betty Blocks application.
- Create a Text variable in the Action Variables and paste the contents of the OneSignal SDK file (copied earlier) into this variable as the default value.
- Install the function block “Endpoint utility functions” and drag the function “Format endpoint result” onto the canvas.
- Assign the variable from step 2 in the option called “Body”, and add the following two headers:
Key Value content-type application/javascript Service-Worker-Allowed / 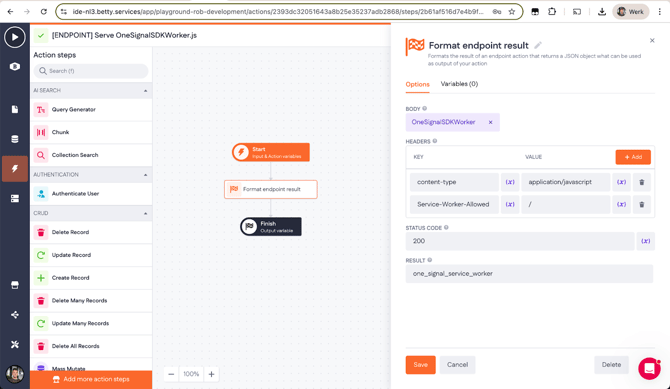
- Set the result variable from the “Format endpoint result” step as the output variable in the Finish step so the action returns the correct JavaScript.
- Now that the action should be set up correctly, copy the action UUID from the URL. Combine this with the application UUID to create the full service worker path: “/api/runtime/<application_uuid>/action/<action_uuid/”. Replace <application_uuid> with the application’s UUID (find this in the advanced settings of your application in My BB) and <action_uuid> with the UUID of the action you just created. We’ll need that in the configuration of the Advanced Push Settings in OneSignal.
- You also have to fill in the names of the files, just copy the names as displayed.

- Verify that the endpoint is working by visiting the generated path in the browser (e.g. “https://<application_identifier>.betty.app/api/runtime/<application_uuid>/action/<action_uuid>/”). If everything is configured correctly, it should return the raw JavaScript code of the service worker.
⚠️ Important note
Since you are self-hosting the service worker, you are responsible for its integrity.
Be sure to audit, version, and monitor this script for any changes over time.
Adding OneSignal to your application’s front-end
Now that we have established the back-end of our OneSignal integration, we want to show a prompt to the end users so that they can subscribe to push notifications when opening the front-end of our application.
- Install the “OneSignal Subscription” component from the block store: https://my.bettyblocks.com/block-store/f98c39a7-fc5c-4d0d-a1fd-fdce6cb031cd. Drag the component onto your page builder canvas and set your OneSignal app ID in the options.
- The app ID can be found In the URL of your OneSignal dashboard, or within the last step “Add Code to Site” of the configuration process.
- You only need to place this component on the page(s) where you want to request permission. It doesn’t have to be on every page.
- This component adds the required code to the <head> section of your application.
- After compiling and opening the page at runtime, the configured prompt(s) should appear to the end user.
- Once a user subscribes, there may be a short processing delay. In the left-side menu of OneSignal’s dashboard, navigate to Audience → Subscriptions to see if your new subscription is listed.
- To enable push notifications on iOS mobile devices, you have to open the Betty Blocks application in the browser and install it as PWA on the home screen. For Android devices this should work out of the box as Android supports push in-browser or PWA.
- On iOS (iOS 16.4+ only):
- Open Safari
- Tap Share → “Add to Home Screen”
- Open app from home screen
- Accept push permission. Only then push notifications are available. If it's running in a browser tab, iOS won’t show notifications at all.
- On iOS (iOS 16.4+ only):
- The component also includes an interaction called “Show push notification prompt”, which you can trigger, for example, with an onClick event on a Button component.
-
- If notifications have already been granted or blocked, the end user will instead see an alert with the corresponding message. These messages can be configured to fit your needs.
⚠️ Important note
iOS will not show notifications if the app runs in a standard browser tab. It must be installed as a PWA.
Once subscriptions are active, you could use Betty Blocks action logic to send notifications via API calls to OneSignal, targeting the user ID or tags set by the SDK. Or use the OneSignal dashboard to manually create and send push messages.
Troubleshooting
To verify whether your integration is working correctly, check the browser console for any error messages related to OneSignal, service workers, or push notifications. Also verify if the service worker is registered, activated and running in DevTools → Application tab → Service workers.
Caching issues (especially service workers)
Your browser might have a cached bad version of the site or service worker.
How to fix:
- Open your app in Chrome → DevTools → Application tab
- Go to Service Workers
- Click Unregister and Clear Site Data
- Also click “Update on reload” if available
- Then reload with
Ctrl/Cmd + Shift + R
Also, try in incognito mode to rule out cache/cookies. Note that some browsers are blocking notification permissions in incognito mode.
SecurityError: Failed to register a ServiceWorker... unsupported MIME type ('text/html')
This means the browser tried to fetch the service worker script (OneSignalSDK.sw.js), but got an HTML page (probably a 404 or fallback) instead of a valid JavaScript file. This breaks the service worker registration and prevents push from working.
As of recent updates (likely since early 2024), OneSignal does not automatically use the CDN-hosted service worker, even when you choose “Typical Site” in the dashboard. Instead, it defaults to looking for OneSignalSDKWorker.js at the root (/) of your domain, which does not work because it’s not possible to host custom files at that path.
Check if the path to the service worker file is correctly configured in your OneSignal account and if the code is being served at that path.
"The path of the provided scope ('/') is not under the max scope allowed ('/api/runtime/XXX/action/XXX'). Adjust the scope, move the Service Worker script, or use the Service-Worker-Allowed HTTP header to allow the scope."
This means:
- You are trying to register a service worker with a scope of / (i.e. whole site),
- But the actual JavaScript file is served from a subpath like /api/runtime/...
- Browsers don’t allow service workers to control paths above where they are hosted, unless you set the Service-Worker-Allowed HTTP header
The Service-Worker-Allowed HTTP response header expands the max scope that a service worker is allowed to control, letting you register the service worker with a broader scope than where the file itself resides.
Example Header: Service-Worker-Allowed: /
This tells the browser: “Even though this service worker is served from /api/runtime/..., it's allowed to control / (the root scope).”
[Worker Messenger] [Page -> SW] Could not get ServiceWorkerRegistration to postMessage!
This means that OneSignal’s main script on your page couldn’t communicate with the service worker, either because it wasn't registered correctly or because the browser couldn't access it under the expected scope.
Here's what it usually means and how to fix it:
- Service worker is not registered at all
- Service worker is registered at a different scope than OneSignal expects
- Service worker was blocked by CORS or CSP
- Service worker crashed or was unresponsive
Confirm the worker registered in Chrome DevTools:
- Go to Application → Service Workers
- You should see:
- The worker script (e.g.,
OneSignalSDKWorker.js) - Its scope (must be / or whatever matches your app root)
- Status: "activated and running"
If nothing is there, registration failed.