Using the Betty Blocks Translations feature, you can create multilingual applications that adapt to local requirements. The feature works by detecting the active language settings in a user’s web browser. If a translation matching the browser's language is available, the application displays it; otherwise, it defaults to the application's primary language.
This guide covers how to configure languages, create translation keys, apply them to your interface, and test the results.
Note: For practical guide on building multilingual applications using a data-based approach, please read Model-based multilingual applications in Betty Blocks
How translations work
Instead of hard-coding text (like "Submit" or "Name") directly into your application components, you assign reference keys.
-
Key: A unique identifier (e.g., Btn_Submit).
-
Value: The actual text displayed to the user based on the selected language (e.g., "Submit" for English, "Versturen" for Dutch).
Managing languages
Before defining keys, you must set up the languages your application will support.
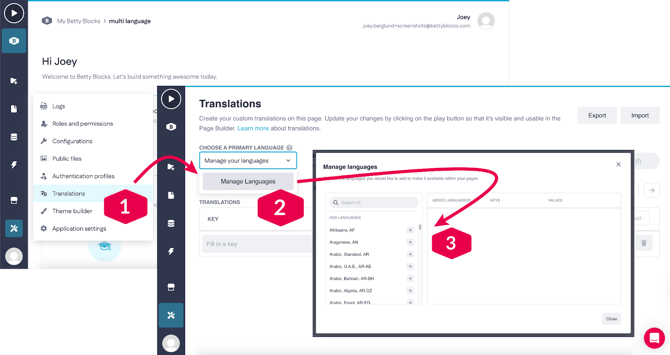
- Open Translations: Click Tools in the builder bar and select Translations.
- Access manager: Open the Choose a primary language (or Choose a language) dropdown menu and click Manage languages.
- Add languages:
- Search for a language by name or scroll through the list
- Click the Add (+) button next to the desired language. It will appear in the Added language(s) list
- Repeat this for all required languages
- Remove languages: If needed, click the 🗑️ icon next to a language in the Added language(s) list to remove it and its associated translations.
- Close the window to return to the main view.
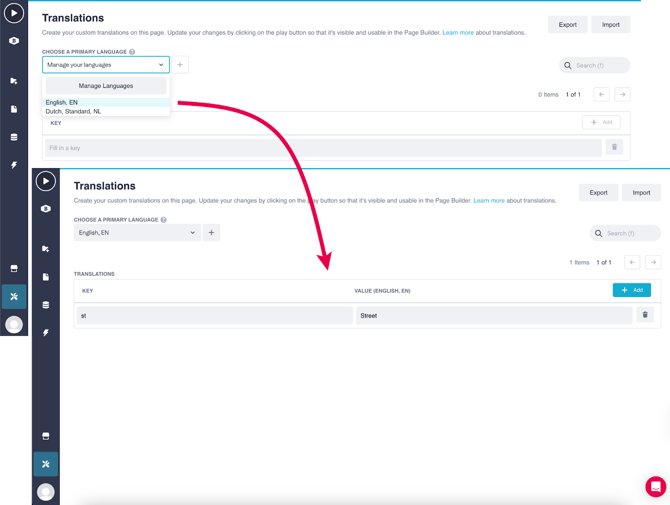
Setting the primary language
Primary language is the default text displayed when no specific translation matches the user's browser settings.
- In the main Translations view, open the Choose a primary language menu
- Select your default language (e.g., English, EN)
- A column will appear for this language, allowing you to define the default values for your keys
Creating keys and values
You need to create a unique key for every text element (buttons, titles, labels) in your application.
Naming recommendations
To keep your keys organized, consider using a naming convention such as:
- Bn to Bnn for Button names
- Txtn to Txtnn for Text elements
- FFn to FFnn for Form Field names
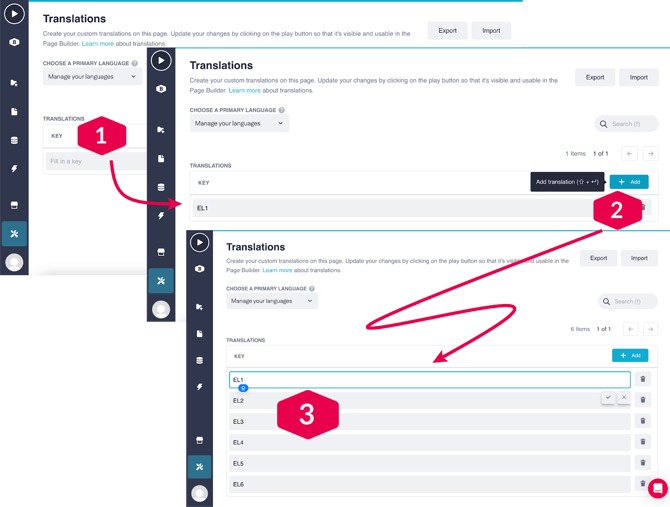
How to add a key
- Enter key name: In the empty Key column (far left), type your unique code (e.g., Btn_Save).
- Add row: Press Enter or click the Add (+) button to create the row. You can also use Shift + Return to quick-add keys.
- Define primary value: In the Primary language column, enter the default text to display (e.g., "Save").
Adding translations (secondary languages)
Once your keys and primary values are set, you can add translations for other languages.
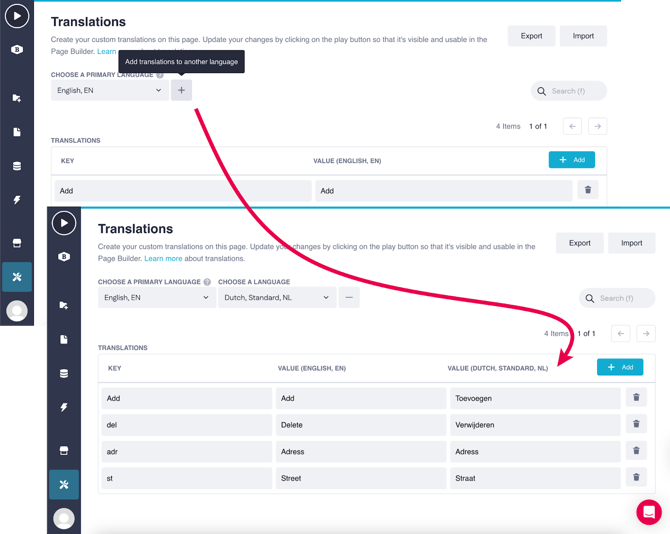
- Click the Add translations to another language (+) button next to the primary language column.
- Select a language from the dropdown (these are populated from the manage languages settings).
- A new column will appear for that language.
- Enter the translated text corresponding to each key.
- Example: For Key St, Primary Value Street, enter Straat in the Dutch column.
Switching views: If you have multiple secondary languages, use the Choose a language menu to switch which translation column is currently visible.
Import and export
For large applications, manual entry can be slow. You can use CSV files to manage translations externally.
- Export: Use the Export feature to download a .csv file of your current keys and values. This is useful for sending to colleagues or third-party translation services.
- Import: You can upload a .csv containing a list of keys and translations.
- Tip: If you have a standard set of keys you use across multiple applications, export them as a template and import them into new projects to ensure consistency.
Applying translations in the application
After defining keys, you must connect them to your user interface.
- Navigate to the Pages module
- Select a component (e.g., a button or input field)
- In the configuration options for that component's text/label, select the Translations button
- Select the appropriate Key from the list.
For full details on applying translations, see this document.
Testing translations
To verify your application adapts correctly:
- Set browser language: Change the default language settings in your specific web browser to the target language (e.g., change from English to Dutch)
- Run application: Press the Play button in the builder bar
- Verify: The application will open in a new window displaying the text values associated with your browser's active language.
Best practices
- Consistency: Apply consistent naming conventions for your keys to avoid confusion as the application grows
- Field length: When translating, ensure the translated term fits within the design of your interface (e.g., German words are often longer than English)
- Completeness: Use the Manage languages view to check the status of your keys; it displays details on the number of keys versus defined values to help you spot missing translations.